Friday, November 23, 2007

Alignment

I think I need to describe how I'm using the jig to align the frame. It starts at the rear axle which is held by spacer blocks that hold it at 2" centered above the jig surface perpendicular to the centerline and level. I then use two spacer blocks to hold the maintube at 2.707" above the jig with side wings that hold it centered. I then just clamp the sidewings to clamp the tube.


The next step is to align the maintube so the headtube is perfectly vertical. To do this I use a piece of straight 5/8" rod. I then made a set of spacers for it by drilling a hole through a piece of wood and mounting it on the rod and turning it in the metal lathe. I made two spacers that press fit into the headtube out of oak to hold the rod. And a third out of pine that is exactly 2" in diameter as a reference at the top of the tube.


I locate the tube front to back by locating the front of the 5/8" rod at a mark I made on the jig. I rotate the tube to align it vertically by using a square and sliding it against the tube and then sweeping it back and forth against the spacer at the top of the rod so it scrapes evenly on both sides. I now know that I'm aligned to within a couple thou.


Wednesday, November 21, 2007

Yay! Headtube!

So I have to say that nova rocks. I ordered a new HT on Friday, I was expecting it to take a week with the holiday and all. I got it on Monday! So yesterday I cut it to length, cut the hole in the frame, and brazed it in place. I am MUCH happier with the brazing on this one. I didn't cook the tube nearly as much. There is very little charred flux (as you can see on the first image). The cleaned up shot is just after hitting it with a wire wheel on the angle grinder. I think I'll leave it like that. I'm no pro yet, but I'm pretty happy with that braze.


I also brazed in the seat mounts and the rear cap plate the other day. The seat mounts got good penetration, I'm quite happy with them. There are a few slightly dry edges, but I'm confident I got good penetration deeper into the joint, I just should have pushed the brass in more all the way round. I was trying to be too tricky by pushing it at only the top and bottom and using the heat to pull it around. On the whole this worked pretty well, but I missed a few spots.


This is the cap at the end of the maintube. I just slip brazed it as it's only moderately structural. It provides some protection against collapsing the tube, but that shouldn't require much and a thin slip braze should be sufficient. I also think I built up a good inside fillet. I put a lot of brass into this joint and not much was left outside. I didn't lose any to the floor, so it has to be somewhere.


Tuesday, November 20, 2007

Things left to do

Time to step back and put my thoughts in order. Here are the tasks I have left to do and some rough estimates on how long it's going to take me. These estimates are pretty rough, but I'm getting better at estimating my time.

  • Fit headtube - 4 hours
    1. Rough cut frame with Dremel cutoff wheel
    2. smooth out frame with Dremel drum
    3. Final fit with die grinder and possibly file
    4. Cut HT to length with lathe (2 cuts)
    5. Mark HT for placement
    6. Braze in HT
    7. cleanup
  • Fit FD mount - 5 hours
    1. Design miter on DeltaCad
    2. Mark tube
    3. Cut tube & test fit
    4. mount AL box tube alignment piece
    5. Final fit tube
    6. make end-cap
    7. cut tube to length
    8. braze end-cap
    9. mount tube to alignment piece
    10. tack braze
    11. finish braze
    12. cleanup
  • Align tube on jig - 1/2 hour
  • Braze BB - 3 hours
    1. make clamp from scraps of tubing, angle and rods
    2. test fit alignment
    3. make spacer piece
    4. tack
    5. finish braze
    6. cleanup
  • make rear-stay connecting pieces - 2 hours
    1. mark out
    2. drill
    3. rough cut
    4. finish grind/file
    5. tap(?)
  • make lower seat stays - 3 hours
    1. drill relief hole
    2. drill out stay
    3. cut to length
    4. cut end slot for dropout
    5. fit dropout
    6. braze dropout
    7. fit pinch bolt
    8. braze pinch bolt
    9. cut slot
    10. cleanup braze
  • finish chainstays - 4 hours
    1. clamp to maintube
    2. fit lower seat stay connecting piece
    3. braze lower SS connecting piece
    4. tack braze to maintube
    5. finish braze to maintube
    6. cleanup
  • Fit brake bosses - 3 hours
    1. make jig
    2. mount bosses in jig
    3. braze
    4. cleanup
  • Fit cable guides - 4 hours
    1. make helper clamp
    2. plan out cable runs
    3. locate and mark locations
    4. clamp and braze for each
    5. cleanup
That should be about it for the frame. There are a few other tasks like the seat mounting plates and the tops of the seat stays. Not to mention paint. But that gets me pretty much done with the steel work. Total estimate is 28.5 hours remaining. I should be able to get this done by around Christmas, which would be a good thing. I should have it on the road, weather and finances permitting, sometime in February.

Sunday, November 18, 2007

Starting over...

In an earlier post I mentioned how my unwise use of a dremel tool with a burr caused a few nicks in the tubing around the seat mounts. Initially I wasn't worried about this, but the more I thought about it, the more it bothered me. I'm worried about stress risers and the loss of strength caused by the thinning of the tube. I ran some numbers based on assuming that the rest of the bike was perfectly rigid (obviously false) and hitting a 2" bump at 50 mph. Granted this was not an FEA approach or anything so sophisticated but it should give a nice upper bound.

I found that the maximum stress was right at the seat mount (no big shock there) and with the full wall thickness I was right at the limit of 4130 steel. Thinning the wall by .005" increased the stress by close to 200MPa which is WAY over the limit. Now I realize that these numbers are way high since it assumes that the rest of the bike is totally rigid, when in fact the tires take up a lot, the fork flexes, the wheel deforms slightly, etc. All of the above dramatically reduce the maximum stress. What the numbers do tell me is how much relative strength is lost by thinning the walls at that location.

Because of this I decided to put that frame aside and start on a new piece of tubing. Realistically the original would probably never fail, but this is my first frame and I just don't have the experience to make that call. I might finish the original frame yet for someone lighter and/or less aggressive than me. 50mph downhills are an everyday part of my commute.

The good thing about all of this is that I still have several pieces of tubing left and the only thing I needed to re-order was the headtube. I took the day off work on Friday and spent some time working on the bike. I am basically back up to my stopping point on the first frame. I'll go over the details in future posts.

Tuesday, November 13, 2007

Head Tube and Rear Fork progress

I made a lot more progress in the last week. Again time has been short, but I got another good day in last weekend and have been getting more efficient otherwise. Overall I'm getting pretty good at joint cleanup and metal shaping. The head tube joint is VERY good, no wiggle at all. The BB is quite tight. It's perfectly parallel with the maintube and within about a degree on rotation just on the initial fitting. I'll sort out the rotation error when I do the final fit, but that's remarkably good for a first effort IMHO.


The thing I need the most work on is brazing. The joints are turning out ok, but not stellar. I roasted the headtube a bit. Note the charred flux. I'm pretty happy with the rear dropout brazing actually. I got really good penetration. I ran a larger tip on the torch and that helped quite a bit. I definitely ran it hotter than the previous joints, but it went MUCH faster, so I'm satisfied with the results. I'm not worried about the HT brazing since it's such an inherently strong configuration. I probably could have tacked it and it would have been more than strong enough.


I had a really cool setup for aligning and brazing the rear dropouts but the camera batteries were dead that day so I didn't get any photos. The Breezer dropouts I used were harder to use than I had thought. They look like they are cylindrical in cross section but they are actually slightly conical. I fitted them by clamping both legs to a board so that the ends were close together and filing them evenly. But I had to do a lot of dremel work to fit the conical section of the dropouts.


To align the rearfork, I first made a false axle supported between two wood blocks. I used a 3/8" rod for the false axle and carefully aligned it perpendicular to the maintube with the fixed nuts set at 135mm apart. I then made wood offset blocks to hold up the maintube at a fixed dimension (2.707") above the plane of the jig. I used a scrap of 2.5" AL tubing to center the ends of the rearfork on the maintube. To miter them, I'm going to use either a laser or just a pencil to scribe around the maintube onto the rearfork arms. I'll need to mount the maintube temporarily behind the rearfork connection to scribe the back. I still need to clamp everything in place. These pics are just a preliminary fit.


I should explain the piece of 5/8" tube running through the headtube. It's held in place with press-fit wood spacers that I turned on the metal-lathe to keep it centered. The cylinder on the end is turned to the same diameter as the width of the BB shell. I will also turn one that is 2" diameter the same as the maintube. By mounting this and then squaring it to the jig, I can ensure that the headtube is perpendicular to the rearfork within good tolerances. I can also use the 68mm one to ensure that the BB is square. I'll post more pics of the technique as I get to it.

Monday, November 5, 2007

Progress!

I've made a lot of progress in the last couple days. I did nothing for over a week but I got a good day of work in on Sunday. I have more than just this post, but I need to take more pictures so I'll post them up soon.

In short, I laid out everything on the maintube, cut all the holes, and brazed in the seat mounting nuts.

Tube laid out with cutting templates

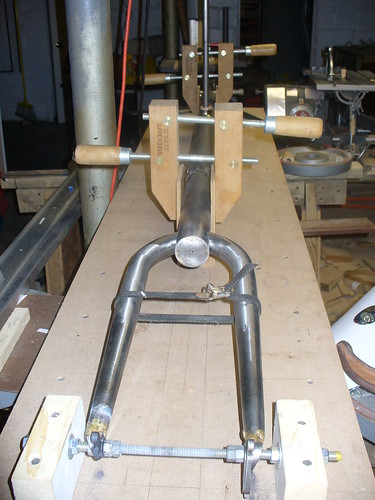
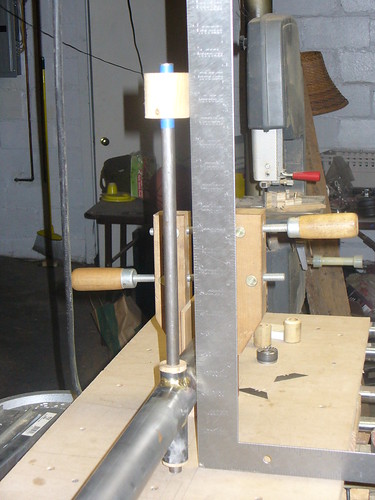
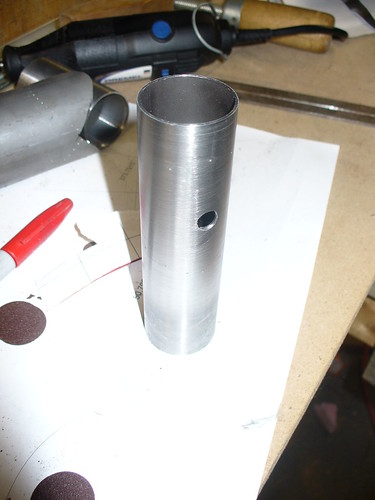
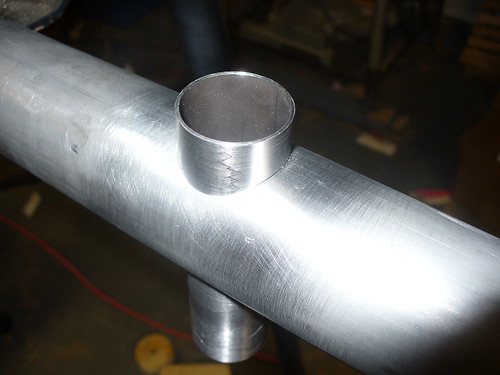
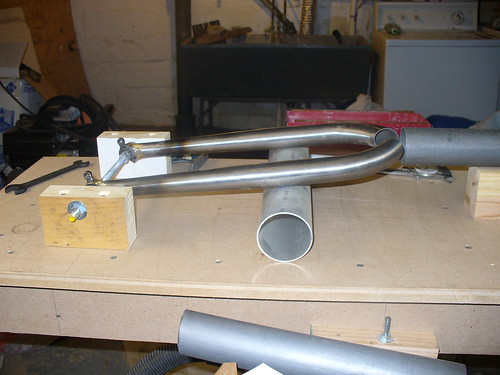
Laying out the maintube

I printed out the cutting templates I created with my little DeltaCad macro. I first scribed a line on the maintube. Then I put on the BB template carefully aligned on the scribe. I then measured off an offset from a mark on the template and scribed a mark on the longitudinal scribe line to align my HT template with. Wash, rinse repeat.

I should note that I forgot to make a template at first for the end cutoff and the angled cut at the bottom of the BB, so I had to retrofit those later working from the existing marks.

Head Tube template marked with center punch

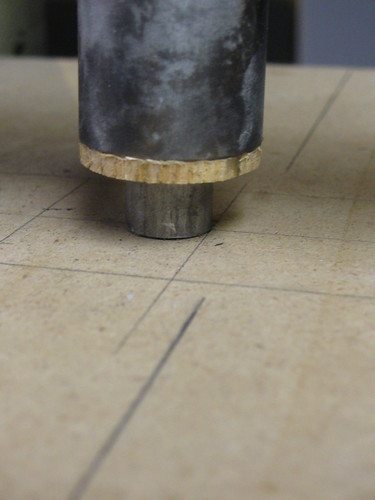
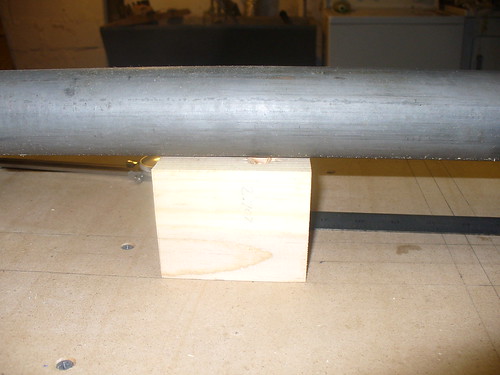
Head Tube cutout marked with center punch

To mark the cut lines, I used an automatic center punch through the paper templates, and then cut the templates off. This proved to work VERY well. The marks are easy to see and follow, and give visible feedback as you file/grind the finished miters. As you approach the punch mark, you can see little divots growing on the filed edge. it proved to be easy to get a PERFECT fit for the headtube.
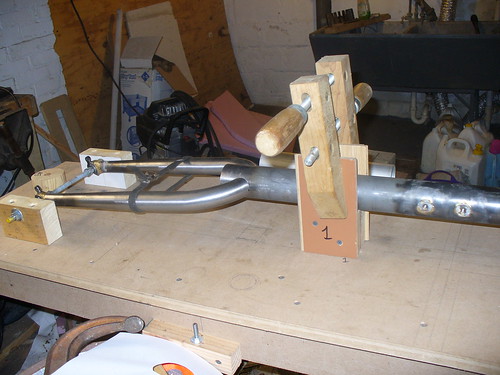
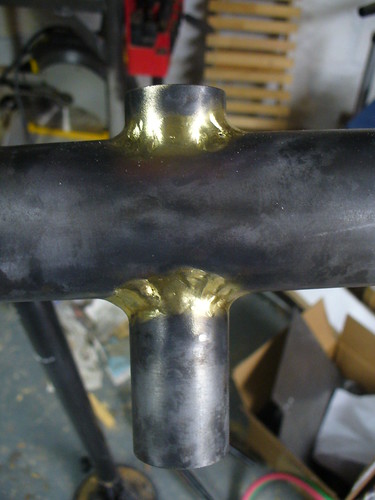
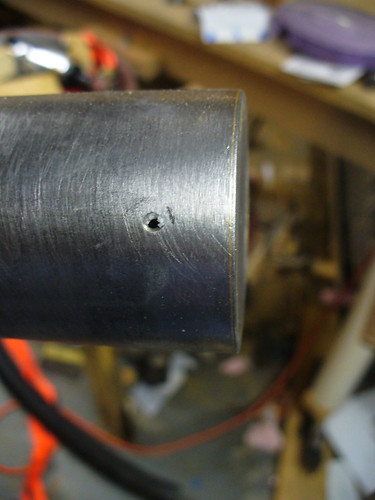

BB template marked with center punch

Bottom Bracket

I marked out the BB hole the same way as the head tube. Here you can really see the utility of a marking template. Because the BB is off center, the hole doesn't look like a slightly elongated circle, but rather a figure 8. I didn't think of adding in the lower angled cut portion of the cut to this template, so after this was marked, I made a new template that just had the angled line on it, cut it carefully to the line, put the template on, and slid it up the tube until it was tangent with the front marks of the BB cut. This worked very well. The finished cut, which I'll post later, looks a bit like a boar's mouth with tusks.
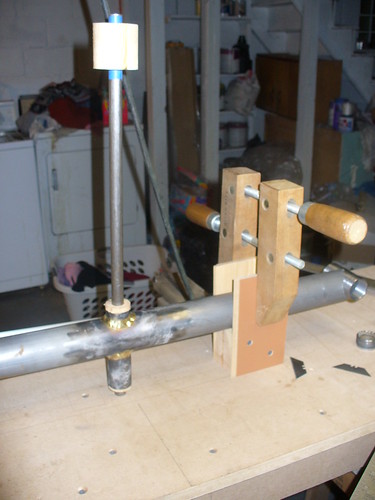
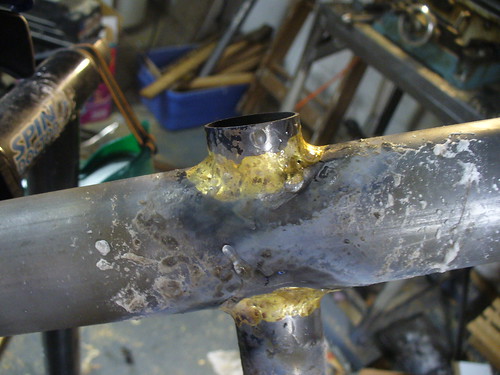
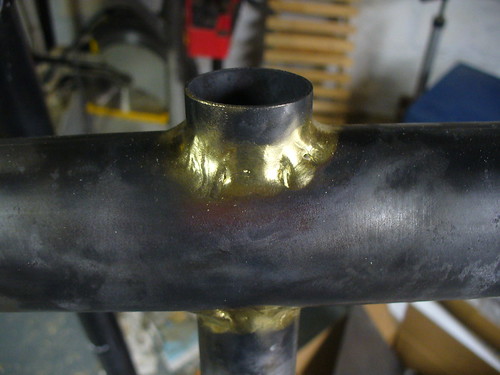
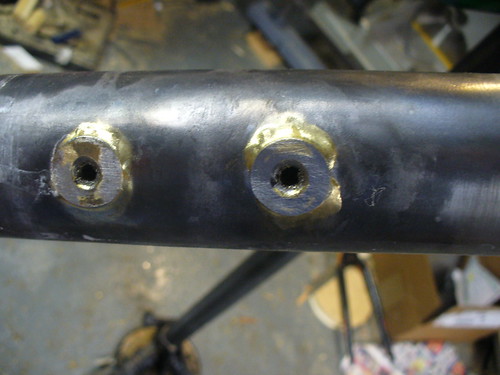
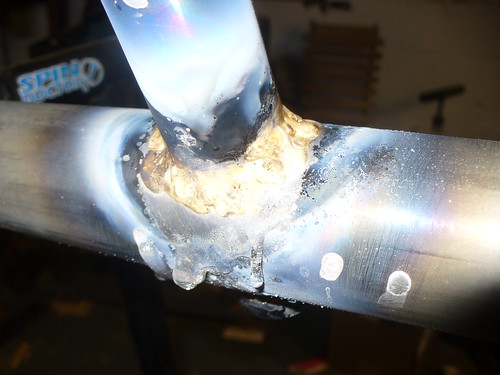
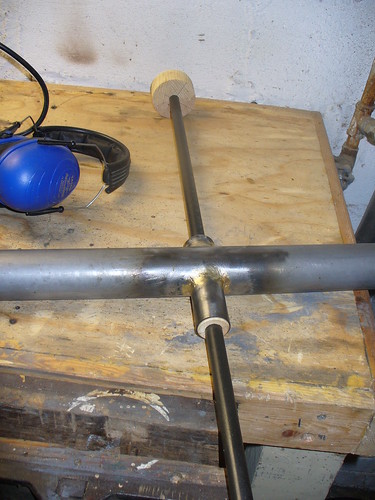


Brazed in seat mount

Seat mount cleaned up

seat mount cleaned up more

Seat mounting nut

For the seat mounting I am using a brazed in nut and slotted plate arrangement a la Volae. The nuts I'm using are weld nuts from McMaster Carr. They have 6mm threading and are 14mm long. The OD of the barrel is about 7.5mm. After I center punched the holes for the weld nuts, I drilled the holes out on the drill press first using a small bit, and then a 5/16" (I think) bit. I then used a countersink to chamfer the holes since the weld nuts have a slightly rounded transition. The nuts were a tight fit in the holes, which is a good thing.

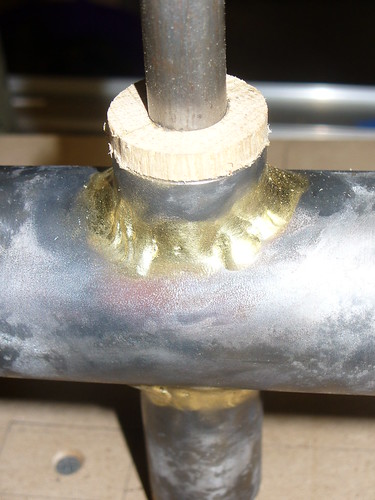
To hold them in place while brazing I used a piece of 6mm stainless steel threaded rod run from left to right through both nuts. The rod was removed between brazes, but you get the idea. This worked well except for the 3rd braze where the rod got stuck in the nut. I suspect some flux got in the threads. I tore a few threads off the end of the rod, but was fortunately able to save the nut by drilling and tapping it. If I had to do it again, I'd run the rod in from below, and put a bolt in from above to keep the threads clean before fluxing. Brass doesn't stick to stainless so that should be safe (and is how I did it for the 4th nut)

To clean up the brazes I started with a flat file, but that wasn't real great. I tried using a dental burr which seemed to work well but made my hand numb after a while. I also realized that I had nicked the tube in a few spots, you can see these in the last pic. They aren't as bad as they look in the pic but they are bad enough I can't sand them out easily. I don't think they will be a structural concern but they annoy me. Ah well, it's my first frame, live and learn. I later switched to using a small but aggressive cutting half round file for cleanup. I like it much better.