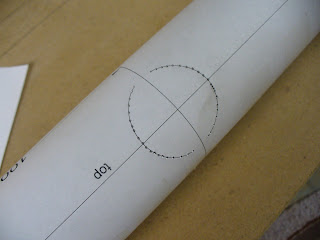
In short, I laid out everything on the maintube, cut all the holes, and brazed in the seat mounting nuts.

Laying out the maintube
I printed out the cutting templates I created with my little DeltaCad macro. I first scribed a line on the maintube. Then I put on the BB template carefully aligned on the scribe. I then measured off an offset from a mark on the template and scribed a mark on the longitudinal scribe line to align my HT template with. Wash, rinse repeat.I should note that I forgot to make a template at first for the end cutoff and the angled cut at the bottom of the BB, so I had to retrofit those later working from the existing marks.

Head Tube cutout marked with center punch
To mark the cut lines, I used an automatic center punch through the paper templates, and then cut the templates off. This proved to work VERY well. The marks are easy to see and follow, and give visible feedback as you file/grind the finished miters. As you approach the punch mark, you can see little divots growing on the filed edge. it proved to be easy to get a PERFECT fit for the headtube.
Bottom Bracket
I marked out the BB hole the same way as the head tube. Here you can really see the utility of a marking template. Because the BB is off center, the hole doesn't look like a slightly elongated circle, but rather a figure 8. I didn't think of adding in the lower angled cut portion of the cut to this template, so after this was marked, I made a new template that just had the angled line on it, cut it carefully to the line, put the template on, and slid it up the tube until it was tangent with the front marks of the BB cut. This worked very well. The finished cut, which I'll post later, looks a bit like a boar's mouth with tusks.


Seat mounting nut
For the seat mounting I am using a brazed in nut and slotted plate arrangement a la Volae. The nuts I'm using are weld nuts from McMaster Carr. They have 6mm threading and are 14mm long. The OD of the barrel is about 7.5mm. After I center punched the holes for the weld nuts, I drilled the holes out on the drill press first using a small bit, and then a 5/16" (I think) bit. I then used a countersink to chamfer the holes since the weld nuts have a slightly rounded transition. The nuts were a tight fit in the holes, which is a good thing.To hold them in place while brazing I used a piece of 6mm stainless steel threaded rod run from left to right through both nuts. The rod was removed between brazes, but you get the idea. This worked well except for the 3rd braze where the rod got stuck in the nut. I suspect some flux got in the threads. I tore a few threads off the end of the rod, but was fortunately able to save the nut by drilling and tapping it. If I had to do it again, I'd run the rod in from below, and put a bolt in from above to keep the threads clean before fluxing. Brass doesn't stick to stainless so that should be safe (and is how I did it for the 4th nut)
To clean up the brazes I started with a flat file, but that wasn't real great. I tried using a dental burr which seemed to work well but made my hand numb after a while. I also realized that I had nicked the tube in a few spots, you can see these in the last pic. They aren't as bad as they look in the pic but they are bad enough I can't sand them out easily. I don't think they will be a structural concern but they annoy me. Ah well, it's my first frame, live and learn. I later switched to using a small but aggressive cutting half round file for cleanup. I like it much better.

No comments:
Post a Comment